Tuesday 30 April 2013

A bunch of fun - altered key experiment

Hello everyone,

So 2013 is my year to explore crafting beyond the norms of paper. I have been seeing some fantastic things on Pinterest and thought I'd give it a go. Here are the results of the experiment.

For the motivation and the fun of sharing art, I participated in a swap for an altered key. It had to be a standard sized key and you could basically decorate it any way you want to.


Sparkly altered key

I had an old necklace with a pretty big decorative key on it that kept on getting in the way, so it was taking up space in my jewellery box. This project was a great way of making it useful again.

I painted the base with metallic craft paints, distressed it and then assembled old jewellery titbits around it. I added craft gems to round off the piece.


Bright sparkly key

Overexposure in photos is a killer. I'm still getting used to this "taking photos for the blog" business, so please excuse the eye-assault. At least you get to really see the diamante pieces now ;)


Altered key - details

Here is a close up of the tail pendanty bits. It was incredibly fiddly to work with that chain as the links were super tiny, but with effort, patience and loads of "counting to 10" it all came together nicely.

I had so much fun making the first key that I went sniffing around for another one to attack alter. I had recently finished a book based on nautical themes and oceans and such. Off course playing in my favourite colours was a blast as well.


Altered oceanic key

Once again I had a necklace that fell short of being practical. I love the colours and finishes on it though, so it became the main focus of the piece.

I played with paints and had this great charm of fish that I de-assembled and used to bring out the nautical theme more.


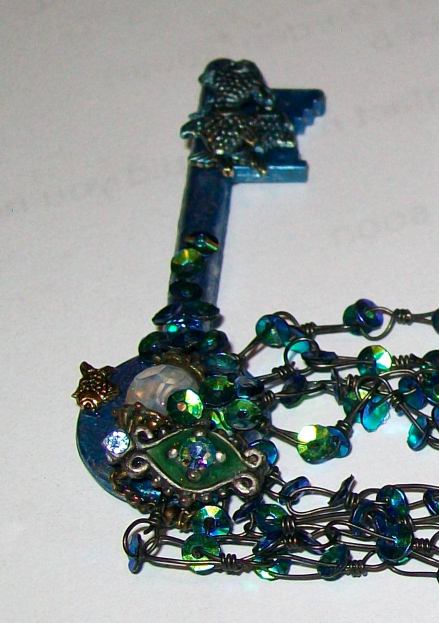
Altered key - detail shot

Here is a close up of the gems around the opening of the key. the little gold fish is on the left hand side swimming towards you. The bigger school of fish is on the head of the key at the back.


Altered key - shiny shot

I'm not sure how this photo effect happened, but I love how shimmery the sequins are in this shot. Quite dreamy.

 So there you have it. Trying new things aren't all that bad after all :)

Cheers
Mar

Friday 26 April 2013

Feathered Mail Art

Hello lovelies,

I recently had the opportunity to indulge my love of birds in art. A swap came rolling my way for a bird-themed mail art project. I opted for making a decorated envelope.

I had a couple of pages lying around from an old encyclopedia that had gorgeous bird images on it. I had a general idea that the birds should have their attention focused around the receiver's address.

I made the envelope out of an old music sheet and used gesso on it to fade it out. Next I splashed some watercolour droplets on it before sticking down the bird images. I also stamped the images surrounding the address area and used my watercolour pencils to add some colour to them. I outlined the birds with a yellow marker to make them stand out more.

Bird mail art envelope - front

For the back of the envelope I did pretty much the same thing.

Bird mail art envelope - back (address blurred)

I really love how this project turned out. It's not like I have a thing for feathers or anything like that (wink, wink).

Thank you for stopping by
Mar


Friday 19 April 2013

Watercolour fun - a first try

As someone who has never done an art course before I have been very intimidated by the traditional art mediums.

As I grow older and more confident in my craft room, I've decided to dive into watercolours and see what I can come up with. I have no training in perspective etc, so please forgive wonkiness (is that even a word?), imbalances and general not-perfectness. I wasn't trying to for perfection, I was simply giving it a shot ;)

I decided to play with ATC size canvasses (2.5" x 3.5") to have some familiar ground to start from. I found this great tutorial series online that gets you to think outside the box. It's called the 10-minute ATC's series by Art Trader magazine and I went for the Watercolour faces one.

Once I got going, I just played around to see where this little experiment would take me. I would highly recommend not only the tutorials from them, but having a look at their (free!) magazine. Your inner artist will sing.

This is the result of the experiment. Seven ATC's of random things done in my favourite colour combinations.

The whole collection

Here is the faces experiment ATC's. I swished paint around, saturating here and subtracting there until I could make out a general face shape. I then used a black fine art pen to fill in the details. I'm sure years from now I'll have a good giggle at the attempt, but for now I am glad I gave it a try. I'll certainly try it again in the future.

Watercolour faces ATC's

For the hot air balloon ATC I had an image to reference from and although the balance is all wrong, I do like the feathery and light feel of the final ATC. 

Hot air balloon ATC

The floral one was done after seeing the 10-minute ATC: Acrylic Impressionism tutorial and wanting to see if I could emulate it with watercolours. I blobbed paint around and roughly formed the flowers and then added the details with a black fine tipped pen. I think it's quite dreamlike.

Impressionism watercolour flower ATC

The next ATC is a good example of the end result being very far from the idea in mind. I was trying to do a cupcake, but as the painting went along, it formed more of a bowl with something in it, so that's what I ended concentrating on. Sometimes you just have to go with the flow (haha). I think the pink stuff could be candy floss. Or strawberry ice cream.

A bowl full of pink stuff watercolour ATC

This ATC was a fun experiment in seeing the shapes in a standard mess of colour. I took some paint and just dragged it along the page in random patterns. As I looked at it, I kept seeing a map emerge. So who was I to deny it from coming out? The coastline was pretty much set, so I just  played with how watercolours can be lightened and darkened. Looking at it now I would probably have done less roads and let the watercolour take the main stage, but these are the lessons we learn right?

Map in watercolour ATC

The flowers one is a clear indication that I am very far off with balance, relationships and perspective in this journey. For now though, I am happy that it does somehow look like flowers, if you squint and twist your head just right ;)

Watercolour flower ATC - wonky and all

Here are some of the final ATC's that I made up with the imagery. I sent them along on Swap Bot, my favourite place to swap.

The hot air balloon got a trim and was stuck to some harder carton. The watercolour paper is not sturdy enough to travel safely in the mail. Distressing the edges gave it a nice vintage feel and made the colours pop. The bird ATC is a separate project. Watch the blog for a Silhouette update coming soon (wink, wink).

Sender's choice ATC's for a Swap Bot swap


The flowers and map also got a trim and was mounted on some sturdier card for mailing. I distressed the decorative edges in complementing colours.

Watercolour ATC's

I hope you are inspired to try something new today.


Hugs
Mar

Tuesday 16 April 2013

Snowflake ATC's

I have the pleasure of dealing with snow in my imagination far more than dealing with the reality of it. I've had minimal contact with snow and only made one snowman in all my life. I think there might have been a snow-angel in there somewhere, but the memory is vague.

When I saw a swap on Swap-bot for some snowflake ATC's I could not resist the temptation and as one does, I wondered what a snow flurry would look like in slow motion.

Snowy ATC fun
I started with making watercolour backgrounds in shades of blue. Then I did some embossing and stamping. I love how the distress ink images seeped into the watercolour paper making fuzzy snowflakes. I added some silver snowflake stickers and tiny gemdots to give the ATC some interest.

Here the days are getting colder. My kind of weather :)

Hugs
Mar

Pollen-free flowers in the mail

I have a love-hate relationship with flowers. They are gorgeous, but oh boy, my sinuses go haywire in Spring. I have found a great in-between in my craft room and flowers are one of my go-to imagery when I make projects.

I participated in a mailart swap that had a flowers theme. I opted to make an envelope with as much flowers as I could fit onto it.


Mail art envelope front (with address blurred out)

Mail art envelope back (with address blurred out)

I gesso'd the envelope and just went nuts with collage and stamping. I also took the opportunity to slip in one of my favourite quotes of all time. Anais Nin surely knew how to turn a phrase.

Happy day darlings
Mar

Emergency gift bag

I needed a big gift bag recently for my Father in law's birthday gift and low and behold, we had none at the house. It was time for some emergency crafting. I got to repurpose in the process as well ;)

I had a lovely brown paper bag, but the problem was the big logo on the sides. I recently discovered the magic of gesso, so after painting both sides with it, I basically had a clean canvas to work with.


Repurposed gift bag side 1

 
Repurposed gift bag side 2

I grabbed some stencils and spray inks and just had fun. I love how quickly the spray inks dry, so this took no time at all. I tried to stick to a more male feel for the bag so that it could be used again.

So there you go. No need to throw out the branded gift packets.

Cheers lovelies
Mar

Monday 15 April 2013

Fairy keepsake matchbox - a mini adventure

Hello everyone,

A while back I happened upon a post by Pixie Hill where she did a tutorial on how to make altered keepsake boxes out of matchboxes. I was enthralled and decided to give it a go.

I decided to keep to be inspired by Pixie Hill and wondered what a fairy would keep in her keepsake box. Here is the result. This is all a little matchbox, so a little fiddly, but I loved the challenge.


A fairy's keepsake box


I'll give you a little breakdown on how I made everything.


Teeny tiny sewing caddy
 I thought that a sewing caddy would be just perfect for this project.


The basket is a jewellery making titbit, the threads are made from cutting up a matchstick and winding sewing thread aroud them, the ball is embroidery thread and the pins are little cut up jewellery-making connectors.


Fairy pets captured in a tiny jar
 Off course fairies will have pets. Here you can see a transparent butterfly and a rocklet.

The butterfly was made by stamping acetate with Stayz-on ink and fussy cutting it out, the rocklet is made from a tiny bead with craft gems as eyes. The moss at the bottom is miniatures grass.


Fairy journal - open
 
Fairy journal - closed
 Off course a fairy would keep a little notebook or journal.

I took a tiny bit of red cardstock, punched a mini tag out of it, distressed it and stuck on some alphabet lettering. This formed the cover. I made the pages out of distressed white pages roughly torn to the size of the journal. The binding is embroidery thread and some jewellery making titbits. The journal is held together by a stapler.


Tiny treasures for the matchbox
 Here are 3 out of the 4 treasures in the mailbox. I forgot to photograph the tiny necklace I made as well. Note to self - photograph at the end of the project and not midway where you can get distracted ;)

The empty matchbox
I lined the base with distressed music sheets and used think mounting card to make the compartments. Remember the moss in the pet bottle? I used some to line the matchbox to look like moss.


All the treasures neatly tucked into their spaces
All snug and ready to be discovered by my partner. Can you see the necklace pendant? It's a jewellery bit with a craft gem on it. The chain was made from the finest chain I had in my collection.


The finished matchbox
Here is the finished keepsake box. The drawer's outside is lined with travel themed washi tape. Can you see the little butterfly on the button?

The titbits on the lid include torn green texture paper, distressed scrap lace, distressed buttons, embroidery thread, craft gems, a scissor pendant and a tiny watch hand on the black button.


All packed up and ready for shipping
Opening up a treasure is half the fun, so I packed this up in a plastic container with some texture paper as the cushioning. Some washi tape and a watercolour butterfly adorned the lid.

Want to see what some of the other participants did for the swap? Here you go.

DuhBe did a steampunk themed box that was absolutely amazing. See her blog post here.
My partner sent me a Marie Antoinette themed box which I adore. See a pic here.

Hugs
Mar