Friday, 10 May 2013

Carding around

Hello, hi, howzit,

I try and make as many handmade cards as I can to give away for different occasions. Not that I think store-bought is bad or anything - there is a place for everything in this life - but it does keep me on my toes and gives me a creative outlet.

So here is a showcase of some cards I made recently. I do not sit down and have a clear idea of what I want to make. I do a rough sketch and give myself a bit of playroom. I find that takes some stress away for me and I can truly fiddle to see if the card works or not. I do not have the energy to follow 'card recipes'.

Oh so happy today card

This card I made for someone as a combination birthday and thank you card. She was quite generous to our household recently and it just so happen to be her birthday close to the day of her generosity.

I love how the stamped background gets muted out by the velum. This gives space for the bright colours of the sentiment really stand out.


Oh happy day card

This was a congratulations card. The floral prints really stood up well against the watercolour background. I love the little cluster of gems in the corner.


Make a big wish card

This  was a card for a friend who was facing the big 30. I tried to give the suggestion of a cake ad love how Stickles made the flame of the candle really come to life. Jip, that is sequin kids. It's one if the big trends in card making at the moment and I love them.


Congrats card

Okay, so I think this one is pretty obvious. It was a card for a new baby boy that dear friends of ours were blessed with. It was my first attempt at a shaker card and I can tell you it had a steep learning curve - hahaha. Do not go fancy on your first try...

I hope these inspired you to make some cards of your own.

Cheerio
Mar

Tuesday, 7 May 2013

A whole bunch of ATC's

Hi everyone,

I make ATC's. They are truly a fun way to experiment and create art pieces.

So what are ATC's? Well, they are Artist Trading Cards that measure 2.3 x 2.5". The only rules in making ATC's is the size and that you trade them. If you want to sell them, they are called ACEO's. I stick to trading them via Swap-bot, so they are ATC's for me :)

So with that said you can basically look at an ATC as a blank canvas that you build up from. I have seen them made from cloth (like a mini quilt), I have seen them in thread (like Cross-stitching), metal, plastic, recycled material etc. I love sticking to paper. I get to try out different techniques and the shipping cost is low. For the blog I will look beyond paper and try some mixed media fun.

So here are some I have made over the last little while. I'll do one of these 'batch' updates every now and then on here to capture a load of them in one go. Who doesn't like eye candy anyway?

Postage stamp ATC's - flower and butterfly

A bunch of balloons for the dark-at-heart ;)

Giving Zentangling a go

Watercolour on yellow ATC

Book page ATC - Love letter

Book page ATC - butterfly stories. The little book even flips!

Stamped woodlands ATC
Mail art ATC

Do you have a favourite amongst them? Mine is the woodlands one - shhh.

Cheerio
Mar

Monday, 6 May 2013

Close enough...

Hello lovelies,

So if you are into paper and crafting, you have come across scrapbooking or journalling in some form or another.

I have tried both ad neither really stuck, but I do love the idea of putting elements together on a page and just playing with textures / colours etc.

For this little play-session in my craft room, I had a bunch of bits and pieces that I really loved, but didn't really know what to do with, so I just did a few pages of randomness.

Mixed media page with pockets

I created two pockets on the page. The one was from some pretty packaging (it was a stamp set if I can remember correctly) and I simply just put red washi tape along the edges to secure it to the page. The other was made with an old calendar page from a small diary with a frame stuck over it. The frame has cellophane in it to serve as a window.

Tags

I made these tags to put into the pockets. I love how the colours correspond to the page.

Mixed media page with old letter as pocket

Here is another page I made with random pretty things. I found this old letter in a secondhand bookshop and just love how pretty it is. The bird at the top of the page is also a tag that is tucked into a cellophane-window pocket.


Mixed media page - highlighting the pockets

Here you can clearly see the letter pocket as it is flipped open and the bird tag removed from it's pocket.
Page insert with pocket

The thing I love about crafting is that there really is very few hard and fast rules. Here is a bit of graph paper that I turned into a small page between pages. It has a pocket and some pretties, but truly, it's just a piece of paper secured with some washi tape to the previous page. A great way to add more oomph to a little experimental craft book.

Tag with tinsel

I got some really pretty tinsel lying around and I was looking for something unique to do with it. I made this tag by punching a circle in heavy cardstock and then placing cellophane over it. I inserted the tinsel in between and used decorative staples to secure everything together.

Page insert - other side

So to make the graph paper page more study, I pasted some scrapbooking paper to the back. I wanted a space to write tiny little notes, so I used tags and just used washi tape to stick them down. The washi tape also serves as the fold to fold them over with.

So if you have a few treasured paper bits lying around that you are not sure what to do with, why not put them together in a book? Give yourself permission to play around and you might just surprise yourself.

Have fun :)
Mar

Friday, 3 May 2013

The ticking of time - a mail art project

Hello guys and gals,

So not too long ago I was tempted into yet another mail art project and this time the theme was... well, it was actually Time.

Time themed envelope - front

For this one I kept it simple and broke out my stamps, inks and watercolour pencils. A little bit of decorative tape along some graph paper makes up the address label.

Time themed envelope - back

The back is done in pretty much the same way, except that it's all stamped and watercoloured. I love this decorative frame stamp and have made a mental note to make use of it more often.

A collection of time theme notecards and matching envelopes

We had to include a little gift inside the envelope, so opted to make a set of blank notecards and matching envelopes for my partner. I used the same elements (stamping, watercolour), but had to add this gold gel medium to round it all off. It fit perfectly.

I've had the time stamps for quite a while and was happy to break them out for such a great swap.

Time to say goodbye ;)

Mar

Wednesday, 1 May 2013

Spring Matchbox

Hello lovelies,

On this beautiful sunny day I thought I'd share a recent project that was a load of fun to put together. It was for a filled matchbox swap in a Spring theme.

The idea of a matchbox swap is to decorate a normal size matchbox in the given theme as well as filling it up with a number of goodies. I love Spring, so it wasn't too hard to let my imagination soar with this one.


Matchbox top
 I chose watercolours and white to be the main colour palette for the matchbox. I used a watercolour butterfly and flower as the main images and added sparklies in the form of glitter pens and craft gems. the butterfly on the button was stamped with Stayz-on ink and it's a great way of embellishing your projects if you need that little something different.  Some pink twine tied together the whole look quite nicely (haha).


Open matchbox with content

The content of the box was a mixture of various Spring themed items that included tiny diecuts, small notepad sheets, charms, brads, beads, stickers and a tiny little plate from a children's tea set.

Happiness and sunshine to you
Mar

Tuesday, 30 April 2013

A bunch of fun - altered key experiment

Hello everyone,

So 2013 is my year to explore crafting beyond the norms of paper. I have been seeing some fantastic things on Pinterest and thought I'd give it a go. Here are the results of the experiment.

For the motivation and the fun of sharing art, I participated in a swap for an altered key. It had to be a standard sized key and you could basically decorate it any way you want to.


Sparkly altered key

I had an old necklace with a pretty big decorative key on it that kept on getting in the way, so it was taking up space in my jewellery box. This project was a great way of making it useful again.

I painted the base with metallic craft paints, distressed it and then assembled old jewellery titbits around it. I added craft gems to round off the piece.


Bright sparkly key

Overexposure in photos is a killer. I'm still getting used to this "taking photos for the blog" business, so please excuse the eye-assault. At least you get to really see the diamante pieces now ;)


Altered key - details

Here is a close up of the tail pendanty bits. It was incredibly fiddly to work with that chain as the links were super tiny, but with effort, patience and loads of "counting to 10" it all came together nicely.

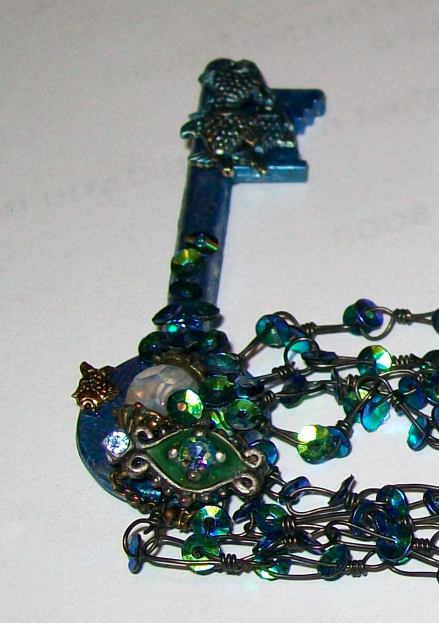
I had so much fun making the first key that I went sniffing around for another one to attack alter. I had recently finished a book based on nautical themes and oceans and such. Off course playing in my favourite colours was a blast as well.


Altered oceanic key

Once again I had a necklace that fell short of being practical. I love the colours and finishes on it though, so it became the main focus of the piece.

I played with paints and had this great charm of fish that I de-assembled and used to bring out the nautical theme more.


Altered key - detail shot

Here is a close up of the gems around the opening of the key. the little gold fish is on the left hand side swimming towards you. The bigger school of fish is on the head of the key at the back.


Altered key - shiny shot

I'm not sure how this photo effect happened, but I love how shimmery the sequins are in this shot. Quite dreamy.

 So there you have it. Trying new things aren't all that bad after all :)

Cheers
Mar

Friday, 26 April 2013

Feathered Mail Art

Hello lovelies,

I recently had the opportunity to indulge my love of birds in art. A swap came rolling my way for a bird-themed mail art project. I opted for making a decorated envelope.

I had a couple of pages lying around from an old encyclopedia that had gorgeous bird images on it. I had a general idea that the birds should have their attention focused around the receiver's address.

I made the envelope out of an old music sheet and used gesso on it to fade it out. Next I splashed some watercolour droplets on it before sticking down the bird images. I also stamped the images surrounding the address area and used my watercolour pencils to add some colour to them. I outlined the birds with a yellow marker to make them stand out more.

Bird mail art envelope - front

For the back of the envelope I did pretty much the same thing.

Bird mail art envelope - back (address blurred)

I really love how this project turned out. It's not like I have a thing for feathers or anything like that (wink, wink).

Thank you for stopping by
Mar